Saturday, November 1, 2014

Henchmen and a Hiatus.

So, I've been slowly picking away at some additional Otherworld henchmen figures, some additional dungeon dressing, and a small fury critter named Gurgi (from the Chronicles of Prydain books).

Some more Thomarillion stuff painted up.
 Role-call for the newly painted.

 This was a Wyrd Miniatures figure used for a Gurgi model - shipped to me by a kind fellow in Germany when I was seeking a suitable mini!

 Henchman #1 - the lantern bearer.  Otherworld Minis.

 Henchman #2 - bag bearer.  He had rather thick dip when dunked so he didn't fare quite so well.  I may eventually go and touch him up - maybe not.


Henchman #3 - I call him the "lootsman".
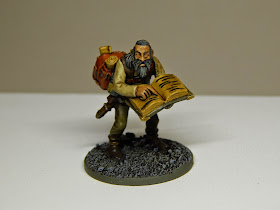
 Henchman #4 - The scribe, map-maker etc.

Hiatus
I'll be departing for a couple of months for a job-related thing, so this blog will be slow going.  It'll be some time early in 2015 before I can return to it, or indeed, any hobby projects.  Thanks for following.  I have heaps of stuff to do starting next year so this is not the end, just a break while I enjoy the comforts of travel for nigh on 10 weeks...(groan)

Wednesday, September 24, 2014

Robotech: Quel-Quallie Zentraedi Ship

While pursuing my original 1/200 scale Robotech project I collected this 1/720 scale Quel-Quallie (Theater Scout) ship by IMAI.  It was a rather poor model kit - thin, brittle plastic with questionable molds along the edges etc. and not much detail to speak of...you know the kind of kit which comes with decals to give you the illusion of detail instead of having it modeled?


The end result turned out pretty good, considering the quality of the kit.  No major modifications and I did not include the big radar cluster which is optional under the craft.  The craft is very brittle and I suspect I'll be repairing the legs sooner rather than later.

Because I assembled the kit without leaving room for a base or mount, I ended up using magnets.  The post is a chopped down paintbrush with a .25" super magnet attached.  I simply drop a magnet into the ship (between the engines) and roll it around until it sticks.  This lets me pivot and "pose" the ship easier at angles.  Also it will make it easier to transport.  Overall I'm happy with the result.

I hope it looks reasonable on a board filled with 1/285th Robotech miniatures though!

A minotaur and some furniture...

 So, just a quick update on the continual dungeon push.  Things are slowing down as I've now finished over 100 miniatures for the dungeon-crawl.  I have knocked out some room furnishings, and a pre-paint Minotaur (re-based, re-armed, and re-painted as usual).  This was an okay miniature but the detail was unfortunately very soft.  The end result is rather "meh".  But he looks better at table-height than he does in pictures so I can't complain.

Another pre-paint monster saved from its terrible factory paintjob!
A bendy and rather unattractive axe was replaced by a decent metal sword.
A smattering of pieces from Thomarillion have been painted up to spruce up the dungeon.


Sunday, August 31, 2014

Owl Bears, Skeletons etc.

So I painted up a couple of odd figures.  One is a kit-bashed "Skeleton King" of some sort.  He'll lead the skeletons when needed.  the other is a very...questionable D&D pre-paint Owl Bear.  I wasn't happy at all with the end result, but it's going to hang around until I paint up another one.

Skeleton King and Owl Bear


I also completed a number of terrain pieces (some of which came out really dark in the photos despite similar lighting...).  I did up three small wall sections (to serve as trap doors or secret walls).


Standing walls.
 

Some treasure piles from Thomarillion
 

Some piles of bones (for use in a variety of games - may do six more piles...)


Bone piles were simple 25mm bases with some Wargames Factory skeletons.


Some trap doors from Thomarillion as well - again on 25mm bases.

Friday, August 22, 2014

Terrible Wyverns

So I ordered a pair of Wyverns from the Pathfinder pre-painted range.  I intended to have these assembled as Gwythaints from The Chronicles of Prydrain series and wyverns for a dungeon crawl.  (I plan on trying to build most of the CoP characters just for fun).

When these showed up I was severely disappointed.  The sculpts were mediocre and the paint on these was super thick and chunky - plastery almost.  Really miserable.  I ended up using several acetone dips and scrubs just to get most of the paint off.

In the end I had two mediocre miniatures so I set about painting them.

 In the painful process of stripping the miserable paint...

 Mounted on 40mm renedra bases and bricks/ballast applied.

Primed up and ready for paint.

Painted and ready for dip...

 Dipped and finished...they didn't turn out great, but are usable.


Monday, August 18, 2014

The White Lizard

While this name is something that people may have called me in the past (being of scant build and questionable pigment...) this is my take on a leader figure for the Lizardmen from yesterday's post.  I wanted something a little unique - so that the figure could serve as an NPC/Player character as well.  It's my version of a type of Albino Lizardman.


Sunday, August 17, 2014

Lizardmen, and a how-to...for beginners!

Added seven Reaper "Dark Heavens Legends" lizardmen.  I believe these are old school and must have been replaced, hence the "legends" bit in their name.  I'm not up to speed with Reaper's catalogue listings.

Step 1: Simple.  Find a common base you'd like to use for your miniatures.  I use 25mm round (1") Renedra plastics.  In retrospect I should have considered washers because I like the ability to use magnet strips to transport stuff - but oh well.  I trim the bases to fit (removing plastic bases on pre-paint miniatrues with hobby clippers, hobby knives, and files.  Bigger monsters I mount on 40mm rounds (used to take up 2x2 squares).  Originally I had planned on 50mm squares, but found they don't fit in all of my 50mm corridors (leading to scraping/binding etc.).  So the 40mm give me a little lee-way.  I use loctite gel super-glue for all of this stuff.

Step 2: (Not pictured!) I forgot to take a pic of this, but oh well.  Apply a good glue (I prefer Elmer's wood glue, or wood glue max) to the base. I first apply a couple of pieces of cut up sprue which provide the look of some bricks or pieces of crumble hallway.  Then I dip the base in a mix of three sizes of ballast.  One is a finer sand-like ballast, the other two are slightly larger rocks.  When finished, let the base dry.  I do not apply this material to the edges of the base.

Step 3: Prime.  I use whatever primer I have on hand, but I normally prefer Army Painter black primer.  You can see the base texture in this figure's base now.  The layers of primer, paint, and dip help solidify the base materials.

Step 4: Simple paintjob.  This one was particularly rushed, and I didn't really do much detail on it.  Some hero characters I tend to spend a lot more time (smaller brushes etc.).  I occasionally shade a tiny bit, and use a good bit of dry-brushing depending on the model.

Step 5: Dip.  I use Army Painter medium shade.  I use pliars to dip the entire miniature - including the base.  The dip applied to the base really helps seal all of the rocks and ballast to the miniature.  I actually dip my stuff inside and use cut up paper towel pieces to carefully draw out excess dip (instead of going outside and shaking the miniatures off etc.).  Let this sit for at least 24 hours, preferably under a fan.  Check back in about 30-40 minutes for any large pools of dip.  I occasionally miss some, but it's not too big of a deal.  If needed, once flattened you can go back over the minis with paint.

Step 6: Flat and base.  Using Army Painter anti-shine I go over the characters quickly.  Do not apply too much and be careful of atmospheric conditions.  Sometimes I find in heavy humidity the anti-shine dulls everything too much and turns them grey.  You'll end up re-painting a bit if this happens.  Once flattened...give them 10 minutes and begin the bases.  I dry brush using German Feldgrau from Vallejo...then followed by Neutral Grey drybrush.  When completed I go around the base edge with Feldgrau again.  Colours obviously can be personal preference.

Lizardmen ready to go.
As you can see, the process is really just a combination of cheating...and tricks.  No talent required to get very reasonable looking miniatures.  One thing I like about the dip is that - when applied to all of your models - it brings all of your models into the same colour range.  It links all of the models together with a common shade effect.  The steps might be a little tiresome some times, but the results are often very good without much time or effort involved.
As mentioned before I take a lot more time on single hero figures, and monster figures.  But the steps are the same - just more careful or ornate brushwork, a few more colours and paint details usually.




Monday, August 11, 2014

Testing Dungeon Saga: The Dwarf King's Quest

So I backed another dungeon crawl game (mainly for minis and for pure geekiness - I rarely play board games).  I downloaded the rules and set up a facsimile dungeon this afternoon to give the very very Alpha (read: simple) rules a go.


 I whipped up a quick version of the board from some D&D tiles (ain't breakin' out my Dwarven Forge fine china for this!)
 The adventurous group gathered (first time these models have been used - note the warrior is standing in for a proper - improper(?) barbarian.
The doors and bad guys are placed...
  
Having watched the videos from BOW, I decided to go on the attack and run straight at the baddies in the first turn - the Barbarian and Dwarf chopped down their foes luckily.
The fight continued in the first room, with a zombie inflicting wounds on the Wizard quite easily and a skeleton getting involved.
After the first room was cleared my heroes ran through the second room - running into a Dwarf revenant (a goblin sitting in for this...).  He was difficult but dispatched.
Two skeletons popped up and were immediately dispatched by the Dwarf and Wizard.

The heroes rapidly exit stage right.
Thoughts:
     My initial thoughts were very "meh" upon running through the game (admittedly solo).  The mechanics are reasonably sound, but the game was very boring and formulaic.  I do think that this is simply the penalty of being a very early starting mission without many additional rules.  Here are my thoughts summed up in bullets for easier digestion...
  • Baddies are tough to kill.  While it's a reasonable system, the bad guys can be very tough to injure.  Even with minimal dice and armour they can be tough if your dice suck.  The Wizard is unlikely to ever be able to kill any of them because of his 2 fighting dice.  With most creatures in this adventure requiring minimum 3 successful wounds to kill.  So, the Wizard is beyond hopeless.
  • Heroes die easily.  While I didn't lose a hero, it is very easy to inflict many wounds.  Now, this mission did not contain any potions or other manners of healing (spells etc.).  Suffering ANY wound immediately drops you a dice (meaning a wounded Wizard rolls 1 dice...).  A barbarian has armor equal to a normal skeleton --- same goes for the elf.  No characters ignore the first wound, so any success against a hero causes a single wound.  Now, could this be negated by gear and adventure scenarios, treasures, gifts, and armor?  Sure.
  • Control zones.  I hate control zones.  The game already looks like it's a little claustrophobic, but even a group of 5-6 bad guys could block a hallway for a very very long time.  I imagine (hope) that certain characters will have an ability to ignore control zones etc.
  • Bone mechanic = gimmick.  I like the idea of bone piles turning into skeletons.  Before this game launched I started assembling some bone piles for my own dungeon crawls.  However the constant presence of this and cards in the necromancer's hand turn this into a bit of a silly gimmick.  Only blocking them by standing on them etc.  I think a mechanic to disrupt/break up a pile or bones would be useful.  Maybe only place bone piles when a skeleton is encountered and killed etc.  It just adds a bit of silliness when you run into a room and immediately want to go stand on a pile of bones.  I can see this becoming tiresome.
  • The barbarian sucks.  He's only a scant bit above an average skeleton in skills/abilities.  The Dwarf is significantly batter in combat and defense.  In any game like this each character needs something very useful or very cool (hopefully both).  I see no reason to play the Barbarian over the Dwarf.  While the barbarian ignores the wounded penalty...it doesn't make up for crappy armour.
  • Overall...meh.  Mechanics are fine, but with any bad luck dice rolling this could become a really serious grind-based game.  I'll be keeping judgement until more rules come out. 

TSG swag and some test cards!

So, the less-then-awesome post.  I received a simple batch of velcro patches I had done up for my small game company, TurnStyle Games.  Turned out nice, and will get slapped on my bags and jackets.

Gaming morale patches!?  Who knew.
Also received some test-cards from The Gamecrafter for a future dungeon crawl project.  Rules are in...some kind of progress.  But while I'm hatching those out I'm doing art (yay for self-taught photoshop...) for the cards so they'll be ready when I figure it all out.
 Deck backs for the proposed game...
Some spell tests and some basic encounter tests - also some fonts are being tested on the left bottom card.  Seeing them in the flesh lets me edit colours, brightness, size of items, fonts etc.


Friday, August 1, 2014

More dungeon heroes and beasties!

After tiring myself out on painting too many miniatures I took a lengthy break.  Then I tackled the boring Gladiator slaves, and finally moved on to the last of my dungeon miniatures.  I have nothing else to paint except a few Otherworld figures.  I have some more stuff on the way.

 Three new adventurers (will be used as NPCs or baddies as well...) an Otherworld miniature, a Reaper miniature, and a plastic kit bash (again Viking/Crusader mix).
 A Reaper Bones stone/rock golem.  The eyes stand out in this picture but are far less noticeable in person.  He's been painted using the same colours I used for my DF kickstarter gametiles - added some washes and some green/brown turf to break up the monotony.
 Bones griffin.  Wasn't a fan of painting this (I hate feathers and fur).  However it ended up perfectly useable and I'm glad it's out of the way.  I will point out also that using Army Painter black primer has worked 100% perfect on my Bones miniatures with no pre-washing and no issues so far.
 I swapped the head on this fella, and that's why he's wearing a double chain-mail hood! (whoops).  I hated the 12-year-old-in-armour look of the original head.
 My favourite of the batch.  I wasn't overwhelmed by this figure when I purchased it, but I really love the way it turned out.   And I assure you, it's more pleasant in person. (and at 2-3' distance!).  He's a huge brute of figure, more 35mm than 28mm but he'll make an excellent bodyguard or adventurer.
 Plastic kitbash turned out fine.  Generic adventuring knight look.  Again this is Gripping Beast plastic Hirdmen stuff with Fireforge Crusaders bits tossed together.  It creates a very convincing "fantasy" medieval look.
The latest additions - as usual the normal minis are on 25mm Renedra rounds, and the larger beasties are on 40mm Renedra rounds.

That wraps up all of my primed and assembled figures.  Next on the list is a batch of 9 lizardmen in the mail right now.  I think after them I'll be moving onto dungeon dressings (terrain).  Thanks for looking!  I hope the next update doesn't take two months!