Showing posts with label Hobby Tips. Show all posts

Thursday, May 8, 2025

The Myth of the 'Dead Game'...

I don't normally post about simple frustrations I have as a gamer, but watching a few videos about the demise of a few big IP products (mainly Star Wars related) it struck home how many people believe in the concept of the "dead game".
 
It shows how many people have fallen for the GW style of manipulation.  Newer or younger gamers are growing up thinking that a "game" is something which needs models, updates, FAQ's, erratas, books, novels, and teasers every month.  That you need organized play packs for tournaments (a niche community in the wider wargaming community), etc.
 
When a company like Atomic Mass Games announces they're ditching Star Wars Armada...it doesn't mean you suddenly can never play the game again.  You may be out of luck if you just started and don't own anything, as prices will tend to spike on remaining stocks as people panic-buy, etc.  However, if you own and play the game...and you think it's a good game, just keep playing it.
 
You don't need new ships, new cards, etc.  A game should be a well-designed and thorough product when launched, not a subscription service of mediocre tat.  If your game needs a full re-design every three years, it's bad on purpose (see GW's business model).  If you need new ships and tokens and cards every month to stay interested - the core product is poor.
 
Unless your game requires some kind of software interface (which does happen with increasing frequency, sadly) you don't "need" anything.  With the advent of 3D printing you can continue to get ships...new ships if you need 'em, and if there is a strong enough community dedicated to the game you can even get new cards etc.
 
There is no such thing as a "dead game" unless you're a dedicated tournament player or someone who runs tournament events.  Even then, you could continue to run the tournaments..you simply won't have any product support from the company, etc.
 
There are millions of wargamers around the world playing wargames every weekend from rules written in the 1970's, and 1980's, etc. There are huge dedicated communities supporting even GW products from the 1990's, etc.  There are more people playing Mordheim than any modern GW fantasy skirmish game - by a large margin.  That game's been out of print for 20+ years.
 
There are huge dedicated forums and fan communities for the original Warhammer Quest...and no one cares about the lack-lustre board game sequels released in the past 10 years.
 
If you like a game...keep playing it.  You don't need drip feed dopamine machinery to enjoy a tabletop wargame.  Stop punishing yourself for a business's decision to stop supporting a product.

Wednesday, February 14, 2018

Hobby Tips: Taking Pictures of Miniatures (easy and cheap!)

I saw this pop up on a forum the other day and I figured I'd do a quick and dirty "how to" for taking pictures of miniatures for your tabletop games when you're not a photographer and have no fancy gear.

What you need:

1) A flat surface.
2) A couple of decent lamps, or a well lit room.
3) A curvable backdrop (even just some printer paper, or poster-board, etc.)
4) A camera.
5) Some simple photo/image editing software.

Your average dirty work desk...in this case I'm taking pictures of some Custodes I'm selling on eBay for a friend.
I use a box of goblins for a "back" to hold my printer paper.
You want the backdrop to curve up against the stop so you don't have any edges or creases in the picture.  There are some pro-fabric and fancy backdrops you can buy if you get serious about this stuff.

I use two LED lights (the ones I use to paint under) and with long necks I can adjust them, so I try to lower the actual light to aim at the front of the miniature, from where I'm taking the picture - this room is particularly dark with only one old overhead lamp.

Steady Hands, or a Tripod

When taking pictures, you'll want either a tripod (using a timer), or simply find a way of supporting your hands/wrists while taking the picture.  I just balance my camera and my arms on the desk etc. to give myself a stable platform when taking pics. 
I snap a picture, making sure my background is large enough that nothing shows on the edges (these Custodes are pushing it!).  It's easier with single figures.  Occasionally I use two sheets of printer paper to make the background larger.
Macro Settings
One thing to address if you're using a camera, or some phones is that you'll want to use the 'Macro' setting.  This ensures the camera is planning to focus on small or tiny things, and is generally much sharper/crisper when taking pictures of little things (or heavily zoomed in for details). 
Now with a closer picture on a single figure - you can see that even with two lamps the picture is a bit grey, a bit dark, and you can see some shadows playing around.  Not a great picture.
Photo Editing Software
This is where you grab a photo or image editing software.  I used GIMP which is like a free version of Photoshop.  It's a paint to learn to use, but even I have managed to teach myself some basics.  In this instance I'm going to edit it by doing two main things to the image: white balance, and then some brightness/contrast adjustments.
White Balance should basically take the closest thing to white in the picture and make it much whiter/brighter (thus adjusting the overall colour of the picture).  Brightness/Contrast allows me to adjust the overall appearance of the picture.
Here is a sample of a picture before and after I make these two small adjustments.  The final picture shows much more what the miniature looks like in real life.
 As taken with the camera (a simple Nikon Coolpix L820)
 With white balance and some contrast/brightness adjustments.
Now...as stated above, I'm not a photographer, but some tips and tricks to help make good pictures.


Tuesday, October 24, 2017

The Rhino-Russ Vindicator gets an upgrade!

While doing my third Rhino-Russ conversion I decided (mainly because I'm cheap) that I wanted to mount my Vindicator's demolisher cannon in a separate larger gun housing.  This would free up my other turret to be used for future Predator use.

Also, a larger superstructure would set the tank apart from the Predator much more, and might justify the Toughness 8 benefit of the Vindicator itself.

 The third Rhino-Russ after priming...ready for paint.
 The third Rhino-Russ assembled and painted - later dipped.
 Started building a box for the demolisher cannon out of plastic.
 Cut down the razorback hatch and mounted some gubbins.  Fitted the demolisher with wood.
 Added some extra armour plating up front.
 Assembled and primed - test fitting.  Note the whole gun box fits into the slot for the normal Rhino hatch - it can be removed, all of the tanks are modular at this point.
The Vindicator's gunbox is chipped and dipped - will be flatted and fitted tomorrow.

At this point I'll have three Rhino-Russes; all three can serve as Rhinos, two are fitted for Predator bits, and one (the non-Predator) is magnetized for the dozer blade and will carry the Vindicator gunbox.  I'm only two sponson short of running the second Predator.  This gives me a lot of versatility in my Chaos Space Marine force - and I'm happy for it.

Tuesday, October 17, 2017

Hobby Tips: Building the Rhino-Russ, Part One

As discussed in earlier blog posts, I am not a fan of the current Space Marine Rhino.  Just think it's kinda clunky/boring.  While I like the nostalgia of the old model it's tiny and hard to get a hold of.  Several months ago I decided to scratch-build or kit-bash my own version of what I think a Rhino could look like.

I had looked online for images of Rhinos which were made using Leman Russ tracks.  I bought some bits and bashed some together.  Since then I've had some people asking how I did it, so here ya go - I've just built a third.

This time I took pictures!

Step One: For this build you'll need a Rhino chassis and Leman Russ tracks --- both are available on eBay sporadically as bit packages.  This should run you roughly $25.00


Step Two: Clean and prep your Leman Russ track bits - you'll use the entire set.


Step 3: Clean and prep your Rhino chassis components.


Step 4: Unless you plan to try to build an interior, these pieces are extraneous and can be set aside.


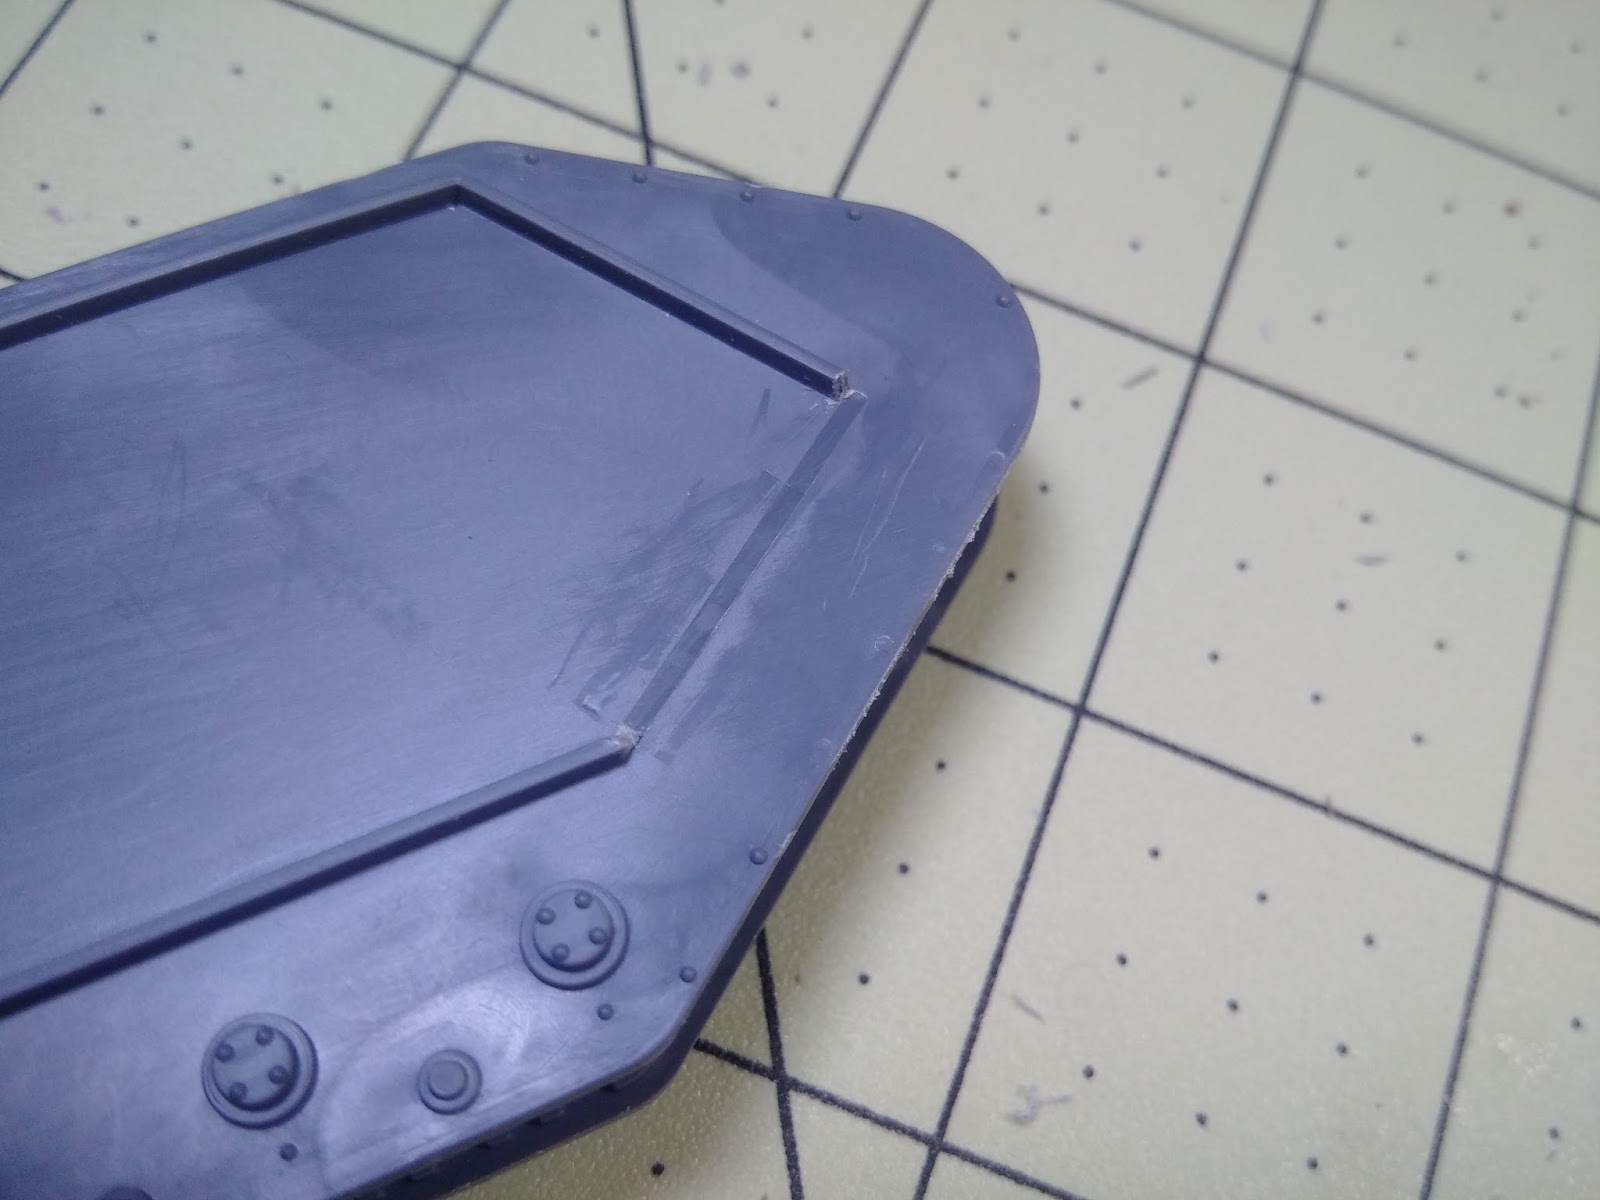
Step 5: Take your Rhino top chassis...you're going to trim off the sides of the chassis.


Step 6: Using an xacto blade, score the inside of the side panels...with some precise cuts they should separate easily enough - clip and sand any remaining bits.


Step 7: This is what you want left --- the central portion of the chassis.


Step 8: Take your Rhino bottom...and simply clean the four tabs off the edges.


Step 9: Ta...frikkin'...da!


Step 10: Depending on what you're building (Rhino, Predator, etc.) you'll want some bits on standby.  You'll need hatches, maybe a lamp or two, and some exhaust pipes (we'll get to those later)


Step 11: If you wish to make your vehicle modular and you want to magnetize some sponsons...NOW'S THE TIME SUCKA.  There's a pretty simple trick to this...


Step 12: The Leman Russ sponsons line up with the spots indicated in the picture above - it will slot into place, but will not stay put unless you glue it or magnetize it.


Step 13: For magnetizing these sponsons I used some pretty heavy/large magnets I had laying around.  I placed one on the inside of the sponson itself.  While being at an odd angle, the strength of the magnet is more than enough.


Step 14: Eat a sensinble meal consisting of a chicken sammitch, pineapple chunks and a light salad.  Then take another magnet, and simply let it clip itself to the inside of the outer track panel.  With the sponson lined up and in place this will test how strong your hold is - and will naturally pull the magnet to where it needs to be.


Step 15: Leaving the sponson in place, sand down your magnet slightly and then apply superglue as needed --- let the magnet attract itself to the right spot.  Let it dry.  Do this for both sides.  Now, when assembled your magnets are invisible inside the track sections.


Step 16:When complete your sponson should hold nicely to the tank without any glue, etc.  At this point, apply white and black facepaint, turn to the nearest friend or neighbor and proclaim "Magnets!  How does that shit work!?"


Step 17: Now the real surgery begins. Up till now, it's just been recess.  Get some clippers and an xacto -- a scalpel version is recommended (you'll use it constantly in hobbying, so get one anyway!)


Step 18: We're going to be using the "inside" of the track section as shown.  The goal is to clear away all of the raised plastic lip between the shown points --- and trim down the back "wheel" area slightly.


Step 19: The other portions of your tank will be resting against this portion of your tracks so you want certain areas cleared of the plastic lip (and sanded/minimized).  This includes three bolts at the front edge of the tracks:


Step 20: Slightly better picture of what you'll want trimmed down:


Step 21: The front edge cleaned up.  Your Rhino bottom and top will be laying on these lips and fitting flush against the sides of the track housing, so make sure to sand them or clean them well.


Step 22: With the track assemblies glued together (leave off the actual track - that is easier to paint separate and can be added later) you're going to stand the track sections upright, and lay the Rhino chassis bottom in between them - resting on the bottom lip.

Step 22B: The best way to measure this --- is to leave the Rhino chassis butting up against this one bolt at the 12 o'clock position on the rear drive wheel.  By lining this up you can ensure both track portions are aligned correctly.  Once satisfied with the fitmen...glue it!

Step 23: Once the bottom of the Rhino chassis is in place - add the front panel.  This will rest perfectly on the front.  It may require minor trimming if you haven't sanded it down to match the bottom - shouldn't be too hard.  The front panel will rest on the front lips and will rest on the bottom rhino chassis.  It should slot right into place.


Step 24: Another view of the front plate installed.  There will be a minor gap at the bottom of the front panel.  It is not visible during play.
  
Step 25: Now the top panel should slot right in - resting on the top lips.  Note that the panel is longer than the rest of the body - you'll fit that in later.


Step 26: At this point, go ahead and assemble the top doors.  I clip off the inside handles so they lay flat - glue them shut.  I leave the door panel separate so you can swap in and out the turreted options.

Step 27: Check the panel fitment before everything dries.  You should have pretty crisp/lined up panels if you've done everything correctly.


Step 28: Now that it's dried more or less, it's time to build the back end of the tank.  This is pretty simple and you'll need three pieces of material.  I use some leftover Renedra plastic bases because they're stout and easy to work with.  You'll be building two side walls and a rear gate.


Step 29: Here's an example from a built kit showing what you'll be doing - and why we shaved the rear lips of the tank earlier.  The inside of the track section will be what lines up your outer walls.  Cut them to slot in, and glue them.

Step 30: Cut a piece of plastic/MDF/whatever you choose to use so it slots and makes a box under the top Rhino panel.  Do this on both sides.  At this point, you're nearing completion --- so if you want to add fancy bits, go for it.

Step 31: Glue both panels in place.


Step 32: Once complete - cut or build a simple square to close up the back of the Rhino.


Step 33: At this point I place a single "convoy light" on one side of the Rhino at the back.  One thing to keep in mind when detailing the back sides of this vehicle --- you have to install the track elements later, so don't place anything too close to the tracks.

Step 34: At this point, add a tailgate or ramp.  You can make this as elaborate as you want.  I just cut out the Rhino bit and glue it into place.

Step 35: Another view of the ramp.

Step 36: Now add some details - this is where I place exhaust pipes - again careful to not place them too close to the tracks.  I place one on each side.


Step 37: Complete!

 This is the vehicle finished for painting (I may swap in a bolter turret)
 The tracks are easiest to paint separately and glue in later.
 Done!

Here are some pictures of my other two in various guises (yes, one has a magnetized dozer blade, etc.)
 One under build with magnetized sponsons and the turret plate in place.
One model with a resin aftermarket "Deimos" pattern turret, etc.

 The Predator model finished.
 The same Predator...swapped into a simple Rhino.
The other Rhino can be swapped into this Vindicator.