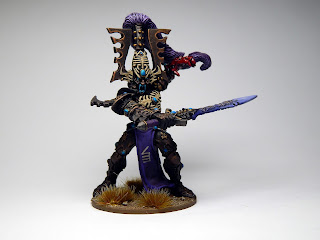
End result? Acceptable, if not attractive. I'm quite glad this guy is behind me now.
Thursday, June 30, 2016
The Bloody Handed One
Disclaimer: I'm not a good painter...and I always cheat. Unfortunately this means that occasionally you run into a large model which is way too intimidating. Enter the Avatar. I sure as hell can't paint fading flames or burning crevasses in this guy's body. I just picked up some metallics and tried to ham-fist my way through this guy.
End result? Acceptable, if not attractive. I'm quite glad this guy is behind me now.


End result? Acceptable, if not attractive. I'm quite glad this guy is behind me now.
Hobby Haul
I'm piecing together some bits from 2nd edition. While I'm concentrating on an Eldar army I've decided to gather up a small Imperial Agents style list as I occasionally feel the desire to paint a space marine etc. Since I wish to use my 2nd edition figures for a variety of space skirmish games as well, I want to diversify the figures I have access too. An Imperial Agents list will allow me some cool techmarines, random space marines, allied Sisters of Battle etc.
I'll probably kitbash Sisters of Battle from Eisenkern bodies + Statuesque Miniatures heads etc. This is not at all a priority and is more of a "when I feel like it" force. Not a large army either. Transport vehicles will probably be third party, etc.


I'll probably kitbash Sisters of Battle from Eisenkern bodies + Statuesque Miniatures heads etc. This is not at all a priority and is more of a "when I feel like it" force. Not a large army either. Transport vehicles will probably be third party, etc.

Snagged a beautiful mint condition Sisters of Battle Codex (I'm only missing the Space Wolves and Imperial Assassins currently)

One of my favourite older figures the Terminator Chaplain. Will likely paint him up as some kind of Inquisition figure/character or a Space Marine Chaplain on loan. The Imperial Agents kind of idea lets you really go a little nuts with the figures etc.

Yet another Eldar War Walker which is already being stripped/filed down.
Tuesday, June 28, 2016
Kickstarter: Miniature Wargaming (and some metal!)
I stumbled upon this and it looks quite interesting. It's a film about the hobby, surrounding the origins of miniature gaming and its current status. I'll probably buy into this for a digital copy, but it looks pretty slick. Production values look pretty good.


I've hit a bit of a speed bump as I've painted so quickly I've run out of bases...primer...and some paints. I have a shipment from Neal over the The Warstore on the way (I hope), so I'm assembling, doing some painting where I can and stripping down incoming ebay stuff.
Here is the latest grab, a metal warwalker from 2nd edition. I've given up on the current plastics that I put together and will be replacing them with metals from 2nd ed. However I will be using plastic weapons and weapon shields - and possibly the rear vanes if necessary. I just can't get over the look of the new plastic warwalkers, they're dreadful.

Friday, June 24, 2016
Step-by-Step Spiders...
I've had some people ask me general questions about how I paint figures...notably, quite quickly. Here is the full process of reclaiming an old figure from start to finish. Note how terrible the figure looks at certain points...and yet in the end it comes to a very reasonable table-top gaming standard.
Note: This is not a how-to for serious painters. But if you want to get decent figures on the table in a hurry, some steps here may aid you.


Note: This is not a how-to for serious painters. But if you want to get decent figures on the table in a hurry, some steps here may aid you.

Figure received from ebay auction.

Using clippers cut the edges of the slot itself.

This lets the slotta base fall off in two simple pieces --- this will avoid any bendage of the feed/slotta normally.

Using "Super Clean", I bathe the painted figures. If you're not using an ultrasonic cleaner - leave them in the Super Clean for 12-24 hours and then (using gloves!) brush them with a toothbrush.

Using a simple $30 ultrasonic cleaner the process can be sped up to under an hour or so.

By the end of the Super Clean bath (and possible sonic bath) the end result should be a clean miniature. On some metals the miniatures will turn a dark/flat grey. This seems to be pretty normal. However the miniature should essentially be free of paint and should appear as-new.

For this Warp Spider (models notorious for falling over) I've opted for a 30mm base instead of the normal 25mm. I clip off the slotta-tab and file down the feet with a metal file so they fit flush to the base (textured side of the base is down). File and clean any flash on the model at this stage as well.

Using Wood Glue Max, layer on a small amount of wood glue (I use small wood sticks to even it out).

I dip the figure/base into a mix of three sizes of ballast (seen in the previous photo). Once dipped I carefully pat down the ballast, shake off any loose stuff and do a quick finger-wipe around the base to ensure no bits are hanging off the edge. Allow this to dry (15-20 minutes will work for the glue I use).

The majority of figures I paint with armour will be based in a single colour of Army Painter primer/colour. This was Skeleton Bone I believe. Applied to the model and the base (we're going to pin down the basing material with glue...primer...dip...paint.)

Apply a standard paintjob (level of detail depends on how much I like the figure and how nice it is to paint). You can see my infantry get simple block colour, a little drybrushing when needed --- nothing fancy.

Using some hobby pliars I dip my miniatures in Army Painter "Strong Shade" dip (kept thin with Mineral Spirits if needed). I dip the entire model, base and all --- at this point the dip will help secure any basing material to the base. I dip one figure at a time, using shredded bits of paper towel to draw out excess dip as it pools in certain areas. Use shredded paper towels - not cut paper towels as the frayed edges grab dip easier. If necessary I'll wipe areas with the paper towel or a q-tip if I need to remove some (the heads on these Warp Spiders were wiped gently with the paper towel).

This is the miniature immediately after being dipped. Note the dip pools in recesses and automatically shades parts of the figure. It covers up a lot of mistakes!

Check back in a few minutes because sometimes large pools will appear -- the dip starts drying almost immediately. It can take a while to get this process figured out.

Allow the dipped miniature to dry for at least 12 hours (I'd suggest overnight). Once dried to the touch, hit it with Anti-Shine. I use the Army Painter version, but any matte-spray will remove the shine, unless you want a shiny figure.

Using a watered down Tierra Earth from Vallejo (whatever colour you want your base) I do the whole base, edge etc.

Once dried, apply a drybrush of a colour of your choice.

To help increase the basing appearance I like to use Army Painter grass tufts as well. I smear Wood Glue Max on a sheet of plastic (so it lays thin) and then I pinch the tuft, set the base in the glue and simply place it on the figure.

And you're done. Cheating works!

A comparison between the ebay auction I won and the end result.

Thursday, June 23, 2016
Save the Craftworld: Episode 6 (oh, and zombies!)
While I have obtained the majority of the metal figures I will need for my current planned force, I've been keeping an eye out on ebay for random lots of metals. Here is a small grab of some guardians from last week.

While I'm done with my proper guardians, the idea has been stirring in the back of my mind to do a small pirate force (maaaaaybe even Exodites) to go with the Craftworld forces. As such a smattering or random metals and some Dark Reaper bits (maybe some bikes etc.) will serve as the beginnings of a pirate force at some point.

The joys of rolling over 20 zombies in a single space...Red mode is hard!

While I'm done with my proper guardians, the idea has been stirring in the back of my mind to do a small pirate force (maaaaaybe even Exodites) to go with the Craftworld forces. As such a smattering or random metals and some Dark Reaper bits (maybe some bikes etc.) will serve as the beginnings of a pirate force at some point.
GAMES: Zombicide Black Plague
While I haven't gotten into much proper wargaming lately, I have managed to get a small campaign of Zombicide: Black Plague started with my brother. We played the demo game, and then started over, each picking characters and we've played through two quests so far.

"Campaign mode! There is no such thing! Blasphemy!" I hear you cry out. Truth. You speaks it.
We've developed a very simple campaign method. I've explained it below:
-Choose a starting set of characters, as normal.
-Begin Quest 01 (the goal being to play through all ten quests and then move into the Wolfsburg Expansion and eventually complete the entire run of quests).
-At the end of a game, characters who are deceased are replaced by newly chosen characters (starting at 0 experience). Surviving characters keep their equipment and may pay two pieces of equipment to heal each wound they have suffered at the end of the game. So if your character ends the game with one wound, he can pay two pieces of equipment to heal this wound. This helps prevent comical levels of equipment build-up.
-Take a picture or note of your characters...when you begin the next game, reduce experience tickers to the start of their current colour band. So, if a character is five points into yellow, he resets his experience ticker to the first point in yellow. The game begins at the highest experience level just like a normal game of Zombicide. As such, you'll be into red-band quite quickly.
-Use the "ultra-red" mode from Wolfsburg. This means that players can cycle through the experience band multiple times, eventually picking up the spare skills un-used on the previous cycle.
-If the entire party is eliminated or wiped out, start over and you luckily get to start at 0 experience. We've decided that if we somehow lose all of the characters in my box, we lose the campaign (unlikely as I must have 40+ heroes!).
Thus far we lost one character in the first game, and one character in the second game. We have some beastly characters built up already, but red zone is atrocious for zombies (as witnessed in the photo above!). And we haven't even gotten to Wolfsburg. I'll be adding the alternate abominations to the deck at some point. Note: I don't own the Murder of Crowz or zombie archers expansions so that'll help us.
Monday, June 20, 2016
All the deadly ladies...
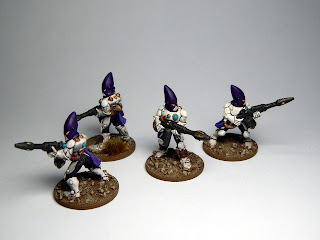
And a quick update for the unit everyone loves to hate. Fast, nimble and armed with power swords. It's the Howling Banshees!


Friday, June 17, 2016
The Guardian Host
Finally finished up the eight leaders for my guardian squads. I suppose I should think up a name for my craftworld at some point. These eight are the last of forty guardians I've assembled. I doubt I'll ever use all four squads but I wanted to cover guardians for certain scenarios, or to allow me to play an Ulthwe-styled army for certain games.
The dip went a littly wonky on me and I'm not overly chuffed with the results (don't really like any of the guardians since dip sucks on white models) but they're done and now I can move onto smaller units of sillier stuff. I'm immensely pleased to be done with the bulk of the force - the "boring" stuff as it were. I figure it's best to get these fellas out of the way.

These four represent the squad leaders. They represent the "corporal" element. If I wish to run smaller guardian squads these will lead the remaining elements. Likewise if I wish the leader to run with a rifle instead of a sword/pistol I can use these figures.

These four figures represent the proper "leaders" of the guardians. They'll lead a squad of ten each. Mixed weapons.

The combined leaders and squad leaders.

The Guardian Host assembled and ready for war. Each squad consists of six guardians with shuriken catapults, two special weapons (flamers, meltaguns or a mix) a squad leader with a shuriken catapult, and a leader with close combat weapons.
The dip went a littly wonky on me and I'm not overly chuffed with the results (don't really like any of the guardians since dip sucks on white models) but they're done and now I can move onto smaller units of sillier stuff. I'm immensely pleased to be done with the bulk of the force - the "boring" stuff as it were. I figure it's best to get these fellas out of the way.

These four represent the squad leaders. They represent the "corporal" element. If I wish to run smaller guardian squads these will lead the remaining elements. Likewise if I wish the leader to run with a rifle instead of a sword/pistol I can use these figures.


Start Collecting: Eldar
When I started building a 2nd edition Eldar army it was around the same time that the "Start Collecting" boxes game out from GW. Now, no one has ever accused GW of having good sales or phenomenal "value for money", but the Start Collecting boxes are close. I was a little surprised there was no Eldar box and so I went about my business.
News just popped up that there is finally a box for Eldar. At first I thought "well, it'll be guardians, warwalkers etc....stuff I don't need". I was pleasantly surprised to be wrong! The box consists of a Farseer/Warlock on Jetbike, three of the new Jetbikes, and a Fire Prism. Oddly it fit perfectly into my force and will not be redundant. I pre-ordered one for a hefty discount ($64 including shipping!) and should receive it in a few weeks when they release.
I may (may!) eventually get a second one - the only issue stopping me is the Fire Prism. I may try to source a Falcon turret for bits, but I don't think I'll be running two Fire Prisms (maybe a Deathspinner instead?). Anyway, it's on the way!
Saturday, June 11, 2016
Assemble the masses! (oh, and zombies!)
I managed to knock out another 18(!) guardians. I originally had planned for maybe three squads of seven or eight guardians apiece. After sorting out my ebay auctions, some Eldar passed to me by my friend, and bits and bobs I realized I have enough components for four full ten-man squads.
I decided to go for it. I may never use all four, but it'd be fun to do a huge game with heaps of Eldar guardians (and it fits many Eldar narratives).


I decided to go for it. I may never use all four, but it'd be fun to do a huge game with heaps of Eldar guardians (and it fits many Eldar narratives).

I used the eight lasgun guardians I ended up with to make special weapon fellas for each squad. Four were turned into flamers (above)

Four were turned into meltaguns. The weapons have intentionally been painted different colours and given some highlight colours to help other players pick them out on the table-top.

The assembled new squad(s).
The last eight guardians I have to paint are (luckily) my squad leaders, sergeants etc. They're mostly different interesting sculpts. Twenty four of my basic guardians consist of a whopping two poses! It got rather tiresome painting these guys. If it were anything other than my Eldar army I would have let them sit for years before attempting to complete a bunch of figures.
I paint quickly, but I've never ever enjoyed painting large numbers of similar troops - particularly not when the poses are limited/static.
Stay tuned for more Eldar!
PS: I did receive a treat in the mail yesterday (well, I had to drive two hours to a distant post-office to pick it up after they refused to change the mailing address when I moved!): Black Plague from Zombicide...an absolutely fantastic game. And boy was the box big!

(insert rather large shit-eating grin)
Tuesday, June 7, 2016
Kickstarter: Massive Darkness
The folks over at CMON have teamed with Guillotine Games again for another good looking Kickstarter: Massive Darkness.
This is a 1-6 player co-op dungeon crawl based around the Zombicide mechanics but with a lot of added elements (minor character development, optional character classes, a "darkness" mechanic for hiding from baddies - roaming monsters etc.). Much like Zombicide Black Plague, this features no Game Master. Already rocketing to $500,000 at the time of this post (a mere hour after the pledging opened up).
If you like dungeon crawls and/or like Zombicide this may be something worth looking into.

Saturday, June 4, 2016
Getting Started: The Tools
I assembled this post as a simple primer for people interested in getting into miniature wargaming/modeling. The miniature wargaming hobby is a difficult thing to put down into simple words when someone asks about it.
In short, playing tabletop games with miniature figurines (normally built and painted). Numerous people have purchased a cool looking box of miniatures at a store only to get home and realize they're in fact multi-part models (this is how I purchased my first box of space marines, thinking I was getting what was advertised on the box lid!).
For those considering beginning the hobby I've provided a list of tools which will aid in building/assembling/painting the figures you plan to put on the table.
Disclaimer: I'm a mediocre modeler and a mediocre painter, but this blog post is aimed solely at entry level gamers. I paint my figures to a tabletop standard --- this means the figures are not entered in painting competitions and I don't spend 12 hours painting a figure's eyeball. As such my tools and tutorials will reflect this!
Setting the Stage: The bare essentials!

Task One: Remove and clean miniatures, prepare them for assembly.
When you purchase most kits now days you'll receive either a metal figure, a resin figure or a plastic kit with numerous components. These parts must be cleaned, trimmed and prepared for assembly. Plastic components will have to be cut and cleaned, resin and metal may have "flash" which is extraneous material still present from the mold --- tabs and injection locations which need to be filed/trimmed down.


Task Three: Paint all the minis!


In short, playing tabletop games with miniature figurines (normally built and painted). Numerous people have purchased a cool looking box of miniatures at a store only to get home and realize they're in fact multi-part models (this is how I purchased my first box of space marines, thinking I was getting what was advertised on the box lid!).
For those considering beginning the hobby I've provided a list of tools which will aid in building/assembling/painting the figures you plan to put on the table.
Disclaimer: I'm a mediocre modeler and a mediocre painter, but this blog post is aimed solely at entry level gamers. I paint my figures to a tabletop standard --- this means the figures are not entered in painting competitions and I don't spend 12 hours painting a figure's eyeball. As such my tools and tutorials will reflect this!
Setting the Stage: The bare essentials!

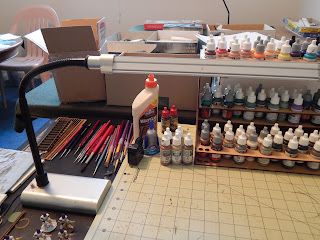
A "hobby" surface is highly suggested to save your table. Some cutting mats like this Fiskar's product are available for very reasonable prices. I used a glass sheet for many years. You need something robust which will hand paint, razor blade cuts and glue, etc. Best if it can be swept clean occasionally.

You'll want one or more white lights over the desk. More important for painting than anything else. A very well lit hobby area is a must! I run two lamps, one on each side of the desk. White light is encouraged as paint will appear much different under say a normal room "orange" lamp.
Task One: Remove and clean miniatures, prepare them for assembly.
When you purchase most kits now days you'll receive either a metal figure, a resin figure or a plastic kit with numerous components. These parts must be cleaned, trimmed and prepared for assembly. Plastic components will have to be cut and cleaned, resin and metal may have "flash" which is extraneous material still present from the mold --- tabs and injection locations which need to be filed/trimmed down.

Clippers are a fantastic and quick way to remove items from sprues and to remove chunks from miniatures. A collection of tweezers may aid in placing small pieces, and hobby pliers are great for holding/placing bits. I use mine to dip figures!

Every modeler will end up with a couple of X-Acto blades. They are used for trimming flash, removing parts from sprues (though slower and a bit more dangerous than clippers!)

After the bits are removed from the sprue and you've clipped any large bits of flash, it's time to use some files. A handful of small emory sticks are great. They can be hobby-specific or picked up in the lady's nail section at your local shop. X-Acto and several companies sell metal files which aid in removing larger chunks from metal miniatures. Note: White metal miniatures are very soft and can be filed using emory sticks as well.
Task Two: Assemble the miniatures. This may depend on how you wish to paint the figures - I frequently use spray paint on various sections so I may paint mine separately and glue later! Remember if you're going to glue painted surfaces, be sure to sand/file them down so that the base material is showing --- this is what the glue will stick to.

You'll be gluing a lot of components together, and you'll need three types of glue. Luckily they're all quite cheap!
- Plastic Model Cement: This is a fine liquid which is dispersed with a needle tip. This is only useful for plastic-on-plastic. The cement actually melts the plastic slightly and creates a chemical bond. Use very sparingly. Once fitted and dried, removing parts becomes impossible.
- "Super Glue": Super glue is primarily used for gluing resin to resin, or metal to resin, or metal to plastic. I highly, highly, highly suggest using a super glue gel so it's easier to control. I use Loctite as pictured, and it is dispersed very easily and precisely via a small tip. Important with any gluing surface, sand/file the surfaces so they are smooth and clean of debris/paint before gluing.
- PVA/Wood Glue: Predominantly used on bases for attaching flock/gravel. You'll see this stuff sold as "PVA" glue for $9 a bottle by some game companies. It's white Elmer's glue! Never buy this stuff from a gaming company. They're cheating you. I prefer using WoodGlue Max from Elmers as it is thicker, stronger and a little easier to work with.
Task Three: Paint all the minis!

Over time you'll accumulate a variety of brushes. Paintbrushes are an entire post themselves, and I'm barely qualified to make one! You can buy great expensive brushes or cheapo brushes at the dollar store. That's up to you. Your material can be nylon/plastic/sable/etc.

A good ole mug you don't care about getting dirty will hold your water and if you're using dropper bottles (like the Vallejo ones in the back) you'll want a simple palette. I use bathroom tiles. They're easy to scrape or clean after use. Some people prefer to paint straight from the pot (like GW pots). I find a palette much easier as it allows mixing water with the paint as needed. Google "wet palette" for some fancy tricks!
The other thing you'll need is a load o paper towels. You'll use these for drying your brushes, wiping off excess paint, etc.
Extra Bits

Sometimes assembling large pieces of miniatures can be frustrating - particularly large metal-on-metal miniatures. Many times people will drill into the opposing pieces and place a small stick of plastic/metal inside --- this is called "pinning". If you're going to do this you'll want a small pin-vice drill or a small manual hobby drill. Comes with several different size tips. I use this drill to mount flying pegs/posts etc.

Used more for terrain than models, a larger metal hobby saw isn't a terrible idea. Sometimes you need to hack through a big chunk of something!
Closing
Hopefully this post has helped provide you with an idea of the simple tools you'll want to assemble as you begin modeling/hobbying. It may seem a little daunting but pick up a couple of tools as you go and find what works best for you. Again, coming from a non-professional the above tools will cover 95% of what you want to do when starting assembling/building/painting miniatures.
Subscribe to:
Posts (Atom)