Note: This is not a how-to for serious painters. But if you want to get decent figures on the table in a hurry, some steps here may aid you.
Figure received from ebay auction.
Using clippers cut the edges of the slot itself.
This lets the slotta base fall off in two simple pieces --- this will avoid any bendage of the feed/slotta normally.
Using "Super Clean", I bathe the painted figures. If you're not using an ultrasonic cleaner - leave them in the Super Clean for 12-24 hours and then (using gloves!) brush them with a toothbrush.
Using a simple $30 ultrasonic cleaner the process can be sped up to under an hour or so.
By the end of the Super Clean bath (and possible sonic bath) the end result should be a clean miniature. On some metals the miniatures will turn a dark/flat grey. This seems to be pretty normal. However the miniature should essentially be free of paint and should appear as-new.
For this Warp Spider (models notorious for falling over) I've opted for a 30mm base instead of the normal 25mm. I clip off the slotta-tab and file down the feet with a metal file so they fit flush to the base (textured side of the base is down). File and clean any flash on the model at this stage as well.
Using Wood Glue Max, layer on a small amount of wood glue (I use small wood sticks to even it out).
I dip the figure/base into a mix of three sizes of ballast (seen in the previous photo). Once dipped I carefully pat down the ballast, shake off any loose stuff and do a quick finger-wipe around the base to ensure no bits are hanging off the edge. Allow this to dry (15-20 minutes will work for the glue I use).
The majority of figures I paint with armour will be based in a single colour of Army Painter primer/colour. This was Skeleton Bone I believe. Applied to the model and the base (we're going to pin down the basing material with glue...primer...dip...paint.)
Apply a standard paintjob (level of detail depends on how much I like the figure and how nice it is to paint). You can see my infantry get simple block colour, a little drybrushing when needed --- nothing fancy.
Using some hobby pliars I dip my miniatures in Army Painter "Strong Shade" dip (kept thin with Mineral Spirits if needed). I dip the entire model, base and all --- at this point the dip will help secure any basing material to the base. I dip one figure at a time, using shredded bits of paper towel to draw out excess dip as it pools in certain areas. Use shredded paper towels - not cut paper towels as the frayed edges grab dip easier. If necessary I'll wipe areas with the paper towel or a q-tip if I need to remove some (the heads on these Warp Spiders were wiped gently with the paper towel).
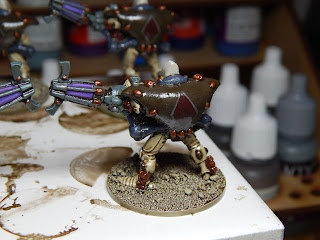
This is the miniature immediately after being dipped. Note the dip pools in recesses and automatically shades parts of the figure. It covers up a lot of mistakes!
Check back in a few minutes because sometimes large pools will appear -- the dip starts drying almost immediately. It can take a while to get this process figured out.
Allow the dipped miniature to dry for at least 12 hours (I'd suggest overnight). Once dried to the touch, hit it with Anti-Shine. I use the Army Painter version, but any matte-spray will remove the shine, unless you want a shiny figure.
Using a watered down Tierra Earth from Vallejo (whatever colour you want your base) I do the whole base, edge etc.
Once dried, apply a drybrush of a colour of your choice.
To help increase the basing appearance I like to use Army Painter grass tufts as well. I smear Wood Glue Max on a sheet of plastic (so it lays thin) and then I pinch the tuft, set the base in the glue and simply place it on the figure.
And you're done. Cheating works!
A comparison between the ebay auction I won and the end result.


No comments:
Post a Comment